Dekorativer Eyeliner Technik

Hard facts
Simplicity machine: Revo 1P 0.30 - 0.40 and Revo 3R 0.25
Zen machine: 1 Micro, 3 Micro
Needle length: 2-3 mm
Speed:
Simplicity Artist: 3 – 5
Simplicity Master: 5
Zen Maschine: 100 – 120
Angle: 60 - 90 degrees
Handpiece guidance: slow to medium
Pressure: gentle
Movements: smooth forward and backward movements of the hand
Note on the use of skin anaesthetising agents:
There are different laws and regulations for the application of anaesthetics (anaesthetic cream/gel) in each country, please inform yourself about the best and most common technique for anaesthesia. Please note that you must discuss your client's medical condition with her and clarify whether she has any allergies. For example, caution is advised in the case of cardiovascular diseases, low blood pressure, etc.
Application of skin anaesthetising agents (anaesthetic cream/gel):
Use a commercially available eye ointment to protect the eyes before applying anaesthetic to the eyes. Apply a small amount of eye ointment to the lower edge of the eyelid and instruct the client not to open her eyes.
The anaesthetic permitted in your country can then be applied (observe the application time specified on the package insert). Apply the cream or gel carefully with a cotton bud using dabbing or rolling movements.
If you use such products for this purpose, make sure you cleanse thoroughly and gently when removing the cream or gel!
The cream or gel is gently wiped off from the outer corner of the eye towards the inner corner, as this direction of wiping corresponds to the natural flow of tears and is gentle on the eye.
Before you start the preliminary drawing, the skin must be dabbed dry in order to be able to draw precisely.
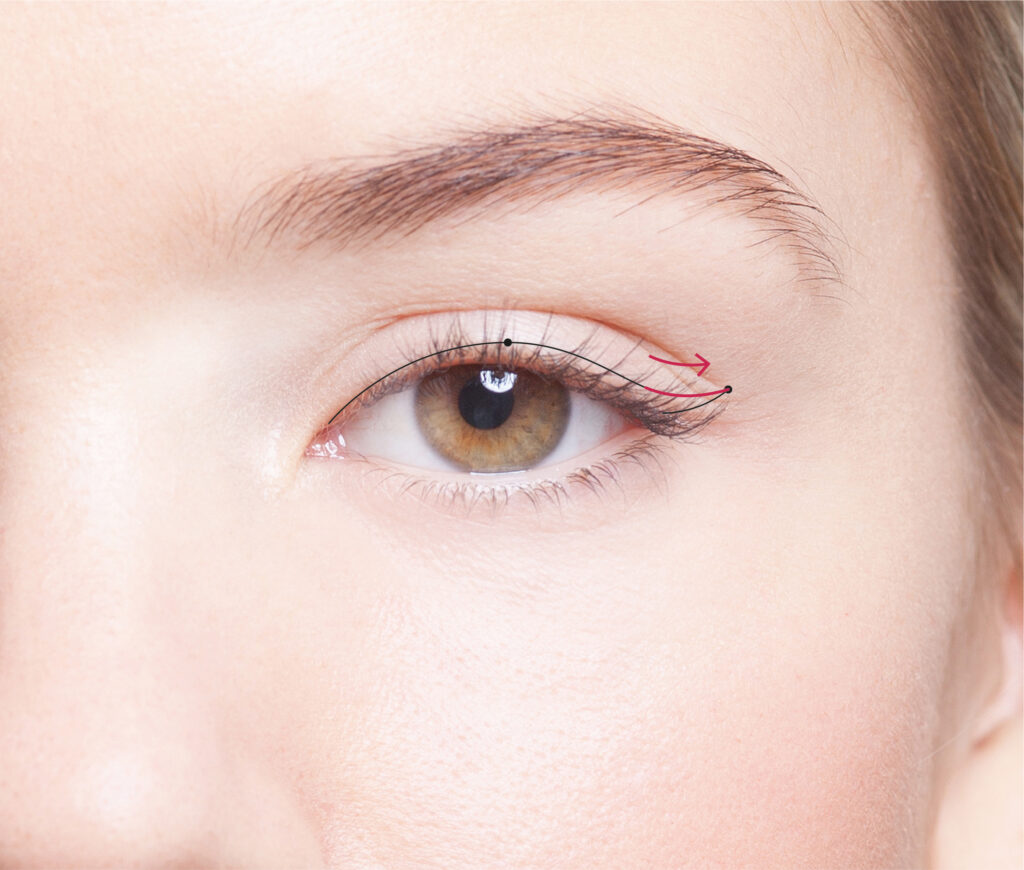
Step 1 - Analyse the eye shape
Determine whether your client has a positive, negative or neutral eye shape.
Include the eyelid crease, as this is decisive for the length of the liner line. Also pay attention to the highest point of the eye.
Step 2 - Start with the preliminary drawing
During the preliminary drawing, particular attention is paid to the eye axes and the position of the eyes, which you have previously analysed.
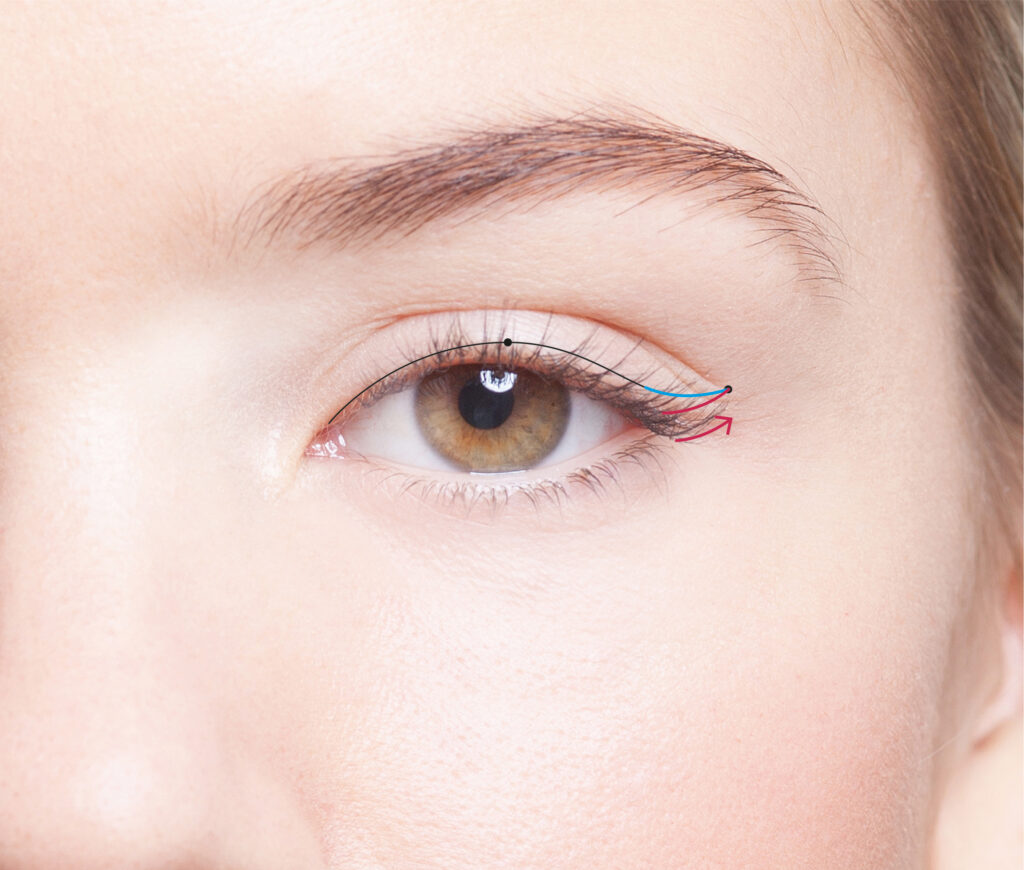
The preliminary drawing can be marked using a dot. This mark determines the length and height of the spout. Mark this point while your client is in a seated, upright and relaxed position. Ask your client to close her eyes and open them slowly to avoid any unwanted facial expressions.
After you have marked the ends of the line (the so-called run-out), you can continue the line you have started and connect and fill it in towards the edge of the eyelid.
Check the symmetry again while your client is in an upright and relaxed position.

Step 3 - Pigmenting the outline
Hard facts
Simplicity Maschine: Revo 1P 0,30 – 0,40
Zen Maschine: 1 Micro
Nadellänge: 2–3 mm
Winkel: 60–90 Grad
Pressure: gentle
Movement: smooth forward and backward movements
Speed:
Simplicity Artist Maschine: 3 – 5
Simplicity Master machine: 5
Zen Maschine: 100–120
The outline is pigmented in three steps:
Step 1:
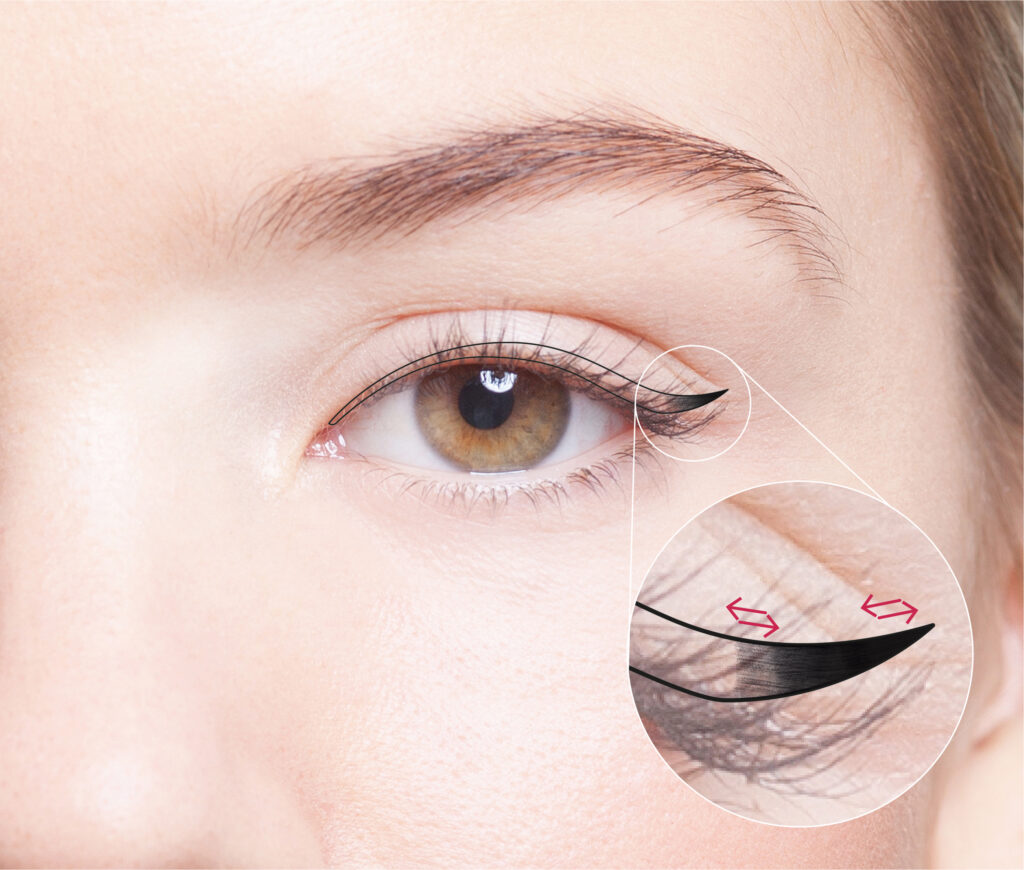
We start with pigmentation in the outer third of the eyelid margin and work outwards.
At the end of the tip, pigmentation is applied outwards with feathering movements to achieve a fine and very delicate tip.
To start, hold the handpiece at a 90-degree angle. After the first pigmented line (approx. 1 to 1.5 cm), use a wipe test to check the colour application (this is done with a cotton bud).
The wipe test serves as a check: check whether an easily visible line is recognisable in the skin so that you no longer have to rely on the preliminary drawing. If this is not the case due to different skin textures, the angle (to 60 to a maximum of 45 degrees) or the pressure can be changed if necessary. Always work carefully, precisely, evenly and gently.
Step 2:
Once the top line of the spout has been pigmented, the bottom line must now be worked in. To achieve a fine, beautiful and precise line, continue to ensure gentle pressure, exact tension and precise lines. We pigment from the corner of the eye to the tip. Again, pay attention to the feathering and gentle movements you make towards the tip.
Use the wipe test again to check whether the ink application and pressure were sufficient.
Master tip:
It is extremely important to apply the first line precisely, slowly and with the correct tensioning technique. If the correct technique is used, the outline of the liner can be completed with the first pigmented line.
Step 3:
Once the outer edge (the spout/tip) of the liner has been pigmented, work your way towards the inner part (the corner of the eye, up to the first lash) of the liner. Always make sure to pigment with gentle pressure. The outline should be clearly recognisable after pigmenting the first line.

Clean the eye thoroughly. Any colour residue in the eyelashes can distort the colour application. Country-specific permitted liquid anaesthetic can be applied after the first line and closed with a thin layer of Vaseline.
Master tip:
Clean the eye thoroughly. Any colour residue in the eyelashes can distort the colour application. Country-specific permitted liquid anaesthetic can be applied after the first line and closed with a thin layer of Vaseline.
Step 4 - The second eye
Now pigment the first line - the outline - on the second eye. Use the smudge test again to ensure that the colour has been applied correctly.
Step 5 - Filling the line: Lines in layers
Hard facts
Simplicity Maschine: Revo 3R 0,25
Zen Maschine: 3 Micro
Nadellänge: 1,5–2 mm
Speed:
Simplicity Artist machine: 3 - 5
Simplicity Master machine: 5
Zen Maschine: 100–120
Pressure: gentle
Winkel: 90–60 Grad
Movements: Forward and backward movements of the hand
Master tip:
Keep the 1 needle for the time being so that you can make any corrections at the end of the pigmentation (fine work).
Now start filling in the liner. Firstly, a clear line is pigmented along the lash line. This gives the decorative eyeliner more width.
The space between the upper line and the lash line is then filled precisely. Work with even forward and backward movements in horizontal lines, in layers so to speak. Pigment parallel to the line. Repeat this process until you have achieved the desired colour result.
Master tip:
Focus on a small part of the liner of about 0.5 to 1 cm and fill this part precisely.
The process (lines in layers) can be repeated four to six times without leaving the area to be pigmented. Check the colour application by cleaning carefully and repeat this process until the desired colour result is achieved.
STEP 6 - The second eye
After completing the first liner, switch to the second eye and repeat this process. A thin film of Vaseline can be applied in between to keep the skin supple.
Master tip:
A perfectly filled area can be recognised by a slight dot formation in the paint application. If this is visible, a rich colour application has been achieved.
Step 7 - Finalising the pigmentation
After completing the pigmentation, clean both eyes thoroughly (especially between the lashes, as colour residue between the lashes can distort the colour application) in order to check the result precisely.
If lighter areas are visible, these can be corrected with the 1-Micro needle.
Check the outlet of the liner in particular: this must be precise and perfect.
The needle is extended (2-3 mm) for precise and fine corrections of the liner.

At the end of the treatment, you can place cooling pads on your client's eyes (or ice cubes in disposable gloves) for about ten to 15 minutes. Make sure that the cooling pads are covered with clean cloths. Any redness or swelling caused by the pigmentation will subside quickly.
If the customer's eye is slightly reddened or irritated, you can use commercially available eye drops to soothe the eye. Always enquire about any allergies and intolerances!
Copyright © 2017 by Pimp Your Skills GmbH
The copyright for the entire content (text, images and video material) is held by Pimp Your Skills GmbH (unless otherwise stated). The content may not be published, partially published, modified or reproduced without the consent of Pimp Your Skills GmbH.